
 Pin it
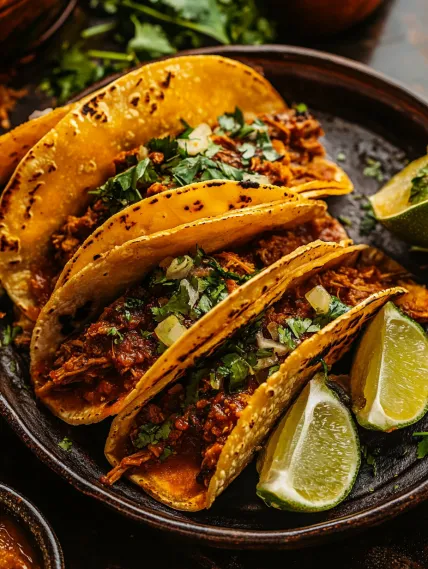
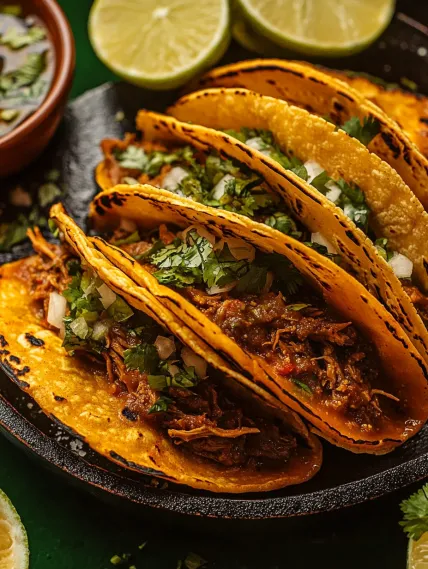
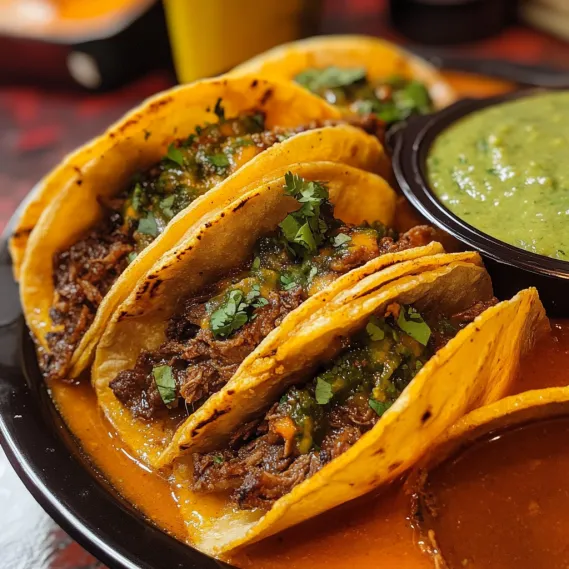
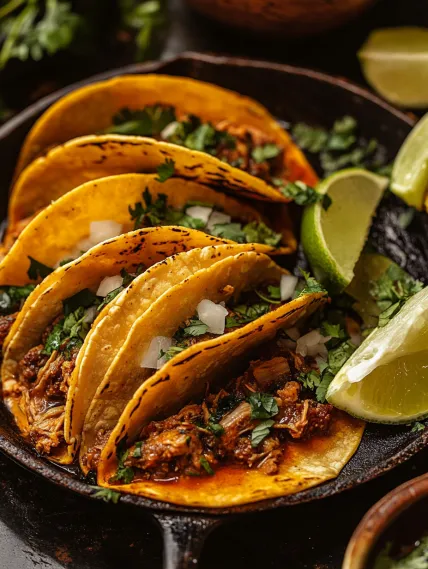
These incredible Birria Tacos pack a flavor punch with juicy, slow-cooked beef, flavorful adobo sauce, and stretchy Oaxaca cheese, all tucked inside a perfectly crisped corn tortilla. The mix of savory meat, spicy consomé for dunking, and that addictive crunchy outside makes for a taco experience that's totally worth the prep time.
The first time I made these at a party, everyone crowded into my kitchen watching me put them together, and couldn't wait to grab them right from the pan. That moment when you dip them in the rich consomé takes these tacos to something truly special.
Key Ingredients and Shopping Advice
- Dried Chiles - Ancho and guajillo chiles bring that real-deal taste; grab them at Latino markets or online shops
- Chuck Roast - Gets super tender during slow cooking; pick one with nice fat running through it
- Oaxaca Cheese - Melts perfectly; swap with mozzarella if you can't find it
- Corn Tortillas - The traditional option that gets wonderfully crispy; go for fresh, quality ones
- Herbs and Spices - Cumin, cinnamon, oregano, and bay leaves create that special birria flavor you'll love
The real trick happens when you dunk those tortillas in the rich, red broth before they hit the hot pan, giving them that famous orange color while packing them with flavor.
Step-by-Step Cooking Guide
- Step 1: Get Your Chiles Ready
- Take out the stems and seeds from your ancho and guajillo chiles. Give them a quick toast in a dry pan until they smell amazing, about 30 seconds each side. This wakes up their flavors for a deeper taste.
- Step 2: Make Your Birria Sauce
- Soak those toasted chiles in hot water for 15-20 minutes until they're soft. Throw them in a blender with chipotles, onion, garlic, crushed tomatoes, and your spices until smooth. This sauce is what makes birria so special.
- Step 3: Brown Your Beef
- Sprinkle beef chunks with salt and pepper, then brown them in a hot Dutch oven until they're golden all over. This step locks in juices and builds amazing flavor.
- Step 4: Let It Cook Slowly
- Pour your chile sauce over the browned beef, add beef stock and water, then cook in a 350°F oven for about 2½ hours. You'll know it's done when the meat falls apart easily.
- Step 5: Get Your Dipping Broth Ready
- Strain the cooking liquid for a smooth consomé. Save some of this tasty broth to keep your shredded meat nice and juicy.
- Step 6: Pull Apart Your Meat
- Use two forks to shred the beef into small, bite-sized pieces. Mix in enough consomé so it stays moist and full of flavor.
- Step 7: Build and Dip Your Tacos
- Warm up corn tortillas so they're bendy. Add shredded beef and Oaxaca cheese to one side, fold over, then quickly dunk both sides in the consomé. This step gives you both flavor and that signature color.
- Step 8: Crisp Them Up
- Cook your dipped tacos in a hot pan until they're crispy outside and the cheese melts inside, about 2-3 minutes per side. You want a crunchy shell with juicy filling.
- Step 9: Get Them on the Table
- Put your tacos on a plate with small cups of consomé for dipping. Top with fresh cilantro and chopped white onion for extra flavor and a pretty look.
- Step 10: Save Any Extras
- If you have leftovers, keep the rice and beef mix in separate containers in the fridge for up to 3 days. This stops the rice from getting soggy.
 Pin it
I found out how important the dipping step is after my first try left me with soggy tortillas that fell apart. Now I always do quick dips and put them straight in a hot pan for that perfect crunch.
Adjusting Heat Levels to Taste
The spiciness in these tacos mainly comes from dried chiles and chipotle peppers. When I'm cooking for kids or guests who don't like heat, I just use two guajillo peppers and focus on their flavor instead of spiciness. For friends who love heat, I throw in some red pepper flakes or a dash of hot sauce for extra kick. Setting up a DIY birria bar lets everyone add toppings they like best.
 Pin it
Easy Party Prep Plan
Birria tacos are my go-to for stress-free hosting. You can cook the beef up to three days ahead and it actually tastes better the next day. When guests arrive, just warm up the meat and consomé, then set up a taco station. People love watching the dipping and crisping process and your house will smell amazing. This way you can hang out with friends instead of being stuck cooking the whole time.
Changing It Up Through the Seasons
I tweak this dish all year round to use what's fresh. In spring, I add young carrots and fresh peas. Summer calls for garden zucchini and cherry tomatoes tossed in at the end. Fall is perfect for chunks of butternut squash cooked until soft. Winter versions get hearty root veggies like parsnips. The creamy base stays the same while different veggies keep it fresh so we never get tired of it even though we eat it often.
Pro Cooking Tips
- Pour in a splash of red wine after cooking the beef to scrape up all the tasty bits
- Try adding a tiny bit of nutmeg to bring out the creamy mushroom flavor
- Cook your rice in butter for 2-3 minutes before adding water for extra nuttiness
- A dash of Worcestershire sauce in the beef mix really boosts flavor
- Cut down cooking time with pre-cooked rice, just use less liquid
I've figured out these tricks after making this recipe many times, especially after I discovered that adding finely chopped celery to the filling gives you that authentic buffalo wing feeling that reminds me of the classic appetizer but in a healthier form.
These Birria Tacos have become my favorite dish when I want to wow people without spending all day cooking. There's something so rewarding about turning basic ingredients into food that tastes like you slaved away for hours. That perfect mix of savory, spicy goodness with melty cheese and fluffy rice just works for almost everyone in the family.
 Pin it
Smart Cooking Tricks
- For no dairy, try coconut cream and dairy-free cream cheese instead
- Make leftovers creamier by blending part of it for a thicker texture
- Add a handful of baby spinach just before serving for extra nutrients
- Sprinkle some smoked paprika on top for pretty color and smoky flavor
- Freeze in single portions for quick grab-and-go lunches
These Birria Tacos show that the best family meals don't need to be complicated. With just a few simple tricks and good ingredients, you can make tacos at home that beat restaurant versions - fresher, less greasy, and exactly how you like them. With a bit of patience and care, basic components turn into a meal that will have everyone asking for your secret.
Frequently Asked Questions
- → Can I use my slow cooker for these Birria Tacos?
- You bet! Once you've browned the meat and mixed up the sauce, just dump everything in your slow cooker and let it go on low for 6-8 hours until the meat shreds easily.
- → What can I use if I can't find Oaxaca cheese?
- Don't worry! Regular mozzarella or Monterey Jack work great as stand-ins since they melt nicely and have a similar mild taste.
- → How hot are these tacos going to be?
- With the mix of dried chiles and chipotles, they pack a medium kick. Want them milder? Just cut back on the chipotles or take out the seeds from your dried chiles.
- → Can I make the meat and broth ahead and freeze them?
- For sure! Both the meat and broth freeze perfectly for up to 3 months. Just thaw in your fridge overnight and warm gently on the stove before making your tacos.
- → What should I serve with my birria tacos?
- They're great with chopped onions, fresh cilantro, lime wedges, and sliced radishes on the side. A scoop of Mexican rice, some refried beans, or a simple cabbage slaw round out the meal nicely.