
 Pin it
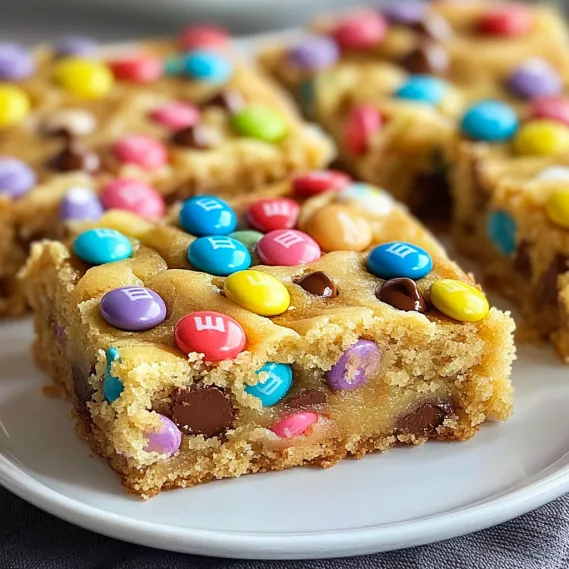
Soft, gooey cookie bars packed with springtime pastel candies make a mouthwatering treat that's ready in no time. Using cake mix as your starting point means less measuring and consistent results every time, while the bright M&Ms dotted throughout add fun pops of color and chocolatey goodness with every mouthful.
I whipped these cookie bars up when I was in a pinch for my kid's Easter celebration at school. With the clock ticking, this easy recipe came through - looking festive without any fancy work. The kids gobbled them up so fast, and I ended up writing down the recipe for three different parents before the party was over.
Key Ingredients and Smart Shopping Advice
- Yellow Cake Mix: Most brands do the job fine, but skip ones with pudding inside. Tub versions make frosting that won't go flat as quickly.
- Large Eggs: They hold everything together and make bars taste rich. Let them warm up first - they mix better than cold ones.
- Vegetable Oil: Gives you that damp, chewy bite everyone loves. Want something richer? Try melted butter instead.
- Vanilla Extract: Boosts sweetness with warm flavor notes. Go for the real stuff for best taste.
- Easter M&Ms: Go for seasonal light colors to nail that spring look. The peanut butter ones add an amazing flavor twist that makes these simple bars taste extra fancy.
- Semi-Sweet Chocolate Chips: Bring more chocolate goodness to every bite. The tiny chips spread out better in your mix.
I've noticed mixing regular Easter M&Ms with peanut butter ones creates this awesome flavor combo that makes these basic bars taste really special. My hubby always grabs all the peanut butter ones before anyone else can!
Step-by-Step Baking Guide
- Step 1: Get Your Pan Ready
- Heat your oven to 350°F (175°C) and put parchment in a 9×13-inch pan, leaving paper hanging over the edges so you can lift bars out later. Give the paper a quick spray with non-stick spray. This setup means your bars won't get stuck and will come out in one piece.
- Step 2: Mix Up Your Dough
- Grab a big bowl and dump in one box (15.25 oz) yellow cake mix, 2 large eggs, 1/3 cup vegetable oil, and 1 teaspoon vanilla extract. Beat it all together with a mixer or by hand until you've got thick, sticky dough. It'll be way thicker than what you'd use for cake.
- Step 3: Toss In The Colorful Bits
- Set aside about 1/4 cup each of Easter M&Ms and chocolate chips for the top. Gently stir 1 cup of Easter M&Ms and 1/2 cup of semi-sweet chocolate chips into your dough with a wooden spoon. Just mix enough to spread them around without crushing the candy.
- Step 4: Fill The Pan
- Push the dough into your pan, making sure it reaches the corners. The dough gets pretty sticky, so you might need to wet your spatula to keep it from sticking. Press those saved M&Ms and chocolate chips on top to make it look fun and colorful.
- Step 5: Bake It Just Right
- Stick it in the oven for 20-25 minutes until the edges turn light gold and the middle looks mostly set but still a bit soft. If you poke it with a toothpick, you should see a few damp crumbs, not wet batter. Let it cool completely in the pan before cutting into squares.
My whole family really goes crazy for these bars when I throw in both regular and peanut butter M&Ms. My husband swears they taste way better the next day after all the flavors settle together. The kids love to help me put the candies on top in cool patterns before we bake them, so it's turned into a fun family activity we do every Easter.
Mastering Your Cookie Texture Balance
What makes these cookies so good is how they mix crunchy bottoms with soft, tasty insides. I've figured out it's all about handling moisture right from start to finish. First, you've got to squeeze that salted cabbage really well or your filling gets all mushy. Then, the cornstarch doesn't just hold everything together - it soaks up any extra wetness. And that cooking method - fry, then steam, then fry again - gives you that awesome crispy bottom while making sure the filling cooks through just right.
Easy Prep Tips for Party Planning
This recipe is such a lifesaver when I'm hosting folks. I can break the work into chunks - shape and freeze the balls up to a month ahead, bread them the day before and keep them covered in the fridge, then just pop them in the oven when company's coming. The smell of these things baking gets everyone's mouths watering before they even sit down. When I've got a big crowd coming, I double up on batches and keep the second one warm in a low oven till we need it.
Clever Ways to Use Any Extras
If you somehow don't finish all these cookies (which hardly ever happens at my place!), you can turn them into completely different meals. Crush them into scrambled eggs for a French-style breakfast, or cut them up and toss with greens and tangy dressing for a quick lunch. My favorite trick is putting halved cookies on top of a bowl of creamy grits for breakfast - it's so good and lets you enjoy those flavors again the next morning.
Pro Tricks for Best Results
- Let the balls cool about 5 minutes after they come out of the oven - this helps the inside set up just right
- Want more flavor? Try mixing a teaspoon of smoked paprika into your panko
- Can't find cookies in stores near you? Order online from places like Bourgeois Meat Market or The Best Stop
- Put out several dipping options - spicy remoulade and cool ranch along with Louisiana sauce
- Make your serving plate look fancy by sprinkling chopped parsley, purple cabbage bits, and yellow pepper pieces around the balls to show off the traditional green, purple, and gold
Frequently Asked Questions
- → Can I swap out the cake mix flavor?
- Totally! Yellow cake mix gives that classic cookie bar taste, but you can mix it up with white, chocolate, or even funfetti flavors. Each will tweak the flavor slightly while still keeping that soft and chewy texture.
- → What's the best way to store them?
- Keep these bars in a sealed container at room temp for up to 5 days. Want to save them longer? Freeze them! Just layer cooled bars with parchment paper in a freezer-safe box. They’re good for 3 months and can be thawed at room temp when ready to eat.
- → Can I skip the M&Ms?
- Of course! Swap the M&Ms with white chocolate chips, nuts, sprinkles, or even candies like Reese's Pieces or mini marshmallows. Other holiday-colored chocolates can give them a unique twist for different seasons.
- → Why do my bars seem dry?
- They might’ve baked too long. Ovens differ, so start checking around 18 minutes. Look for lightly golden edges and a soft center—remember, they'll firm up as they cool. Slightly underbaking keeps them nice and chewy!
- → Can I make extra by doubling it?
- Yep, you can double the ingredients and bake in two 9×13 pans. Just don't bake a bigger batch in one pan—edges could overcook before the center finishes. For larger quantities, stick with separate pans or batches.
- → How can I tell when they're ready?
- Edges should look light golden with the middle set but still soft. A toothpick should come out with some crumbs, not wet batter. Taking them out a little early gives chewy results as they'll firm up while cooling.